Run SQL Queries on CSV Files With SQLite (4 Methods)
Have you ever struggled to open large CSV files and wished for a simpler solution to run SQL queries over them without heavy database setups? That's where SQLite shines—it's lightweight, file-based, and requires zero configuration. In this guide, we’ll show you how to efficiently import and query large CSV documents, both with and without a GUI. You'll learn how to do this with the DBeaver database client for a more user-friendly, visual experience, and then directly through the SQLite CLI for a straightforward and much more performant way.
Comparing 4 Methods to Open CSV Files in SQLite
If you want to work with CSV data in SQLite, you have these options:
- Using a GUI like the DBeaver database client.
- The
.importcommand in the SQLite database which is the most straightforward and used approach to import CSV files. - The CSV Virtual Table for flexible on-the-fly querying in SQLite database.
- The File I/O functions for more complex imports across multiple formats, including but not limited to CSV files.
Below we provided a table to give you a more in-depth overview of each method.
| Method | Description | Pros | Cons | Ideal Use | Source |
|---|---|---|---|---|---|
| 1. DBeaver GUI | Utilize the DBeaver database client to import CSV files into a SQLite database using GUI. | - User-friendly. - Visual tools for data mapping and schema design. - Supports data transformation during import. | - Requires installation and setup of DBeaver. - Slower than command -line method for very large files. - Consumes more system resources. | For users who prefer a graphical interface and need to import CSV files with custom data mappings or transformations. | DBeaver Documentation |
2. .import Command in SQLite | Simple command-line option for quick CSV imports. | - Fast and straightforward. - No need for pre-creating a table. - Can skip headers with --skip 1. | - Limited control over schema. - No data transformation or validation. - Requires clean, structured CSV format. | For quick, basic CSV imports when you need minimal setup. | .import Command Documentation |
| 3. CSV Virtual Table in SQLite | Allows querying CSV files as if they were part of the database, without importing data. | - No import required. - Query directly from CSV. - Flexible for temporary data use or external datasets. | - Does not store data in the database. - Performance can be slower on large datasets compared to actual imports. | For querying huge CSV on the fly without needing to persist data. | CSV Virtual Table Documentation |
| 4. File I/O Functions in SQLite | Advanced approach using functions like readfile() to manually process and import CSV or other file formats. | - Full control over data import. - Supports multiple file formats. - Custom processing and validation are possible. | - Requires more setup. - More complex compared to .import. | For complex or multi-format imports where data needs to be processed, validated, or manipulated before import. | File I/O Functions Documentation |
Now that we've outlined the available methods, let's focus on the first two—they're the simplest and cover the most common use cases. We'll start by using the DBeaver database client for a graphical approach, then explore SQLite’s .import command for command-line efficiency. You can learn more about the two other methods through their documentation.
Method 1. Using GUI to Import CSV Files into SQLite with DBeaver Database Client
DBeaver is available for all major platforms (Windows, macOS, and Linux). Before we begin, ensure you have it installed—you can download it from the official website. For this guide, we'll be working with the Windows version.
Step 1: Set Up a New Database Connection
You don’t need to install SQLite separately—DBeaver will prompt you with a pop-up to install the necessary drivers when you create an SQLite database.
- Start by opening DBeaver and creating a connection for your SQLite database. From the main menu, click
Database > New Database Connection.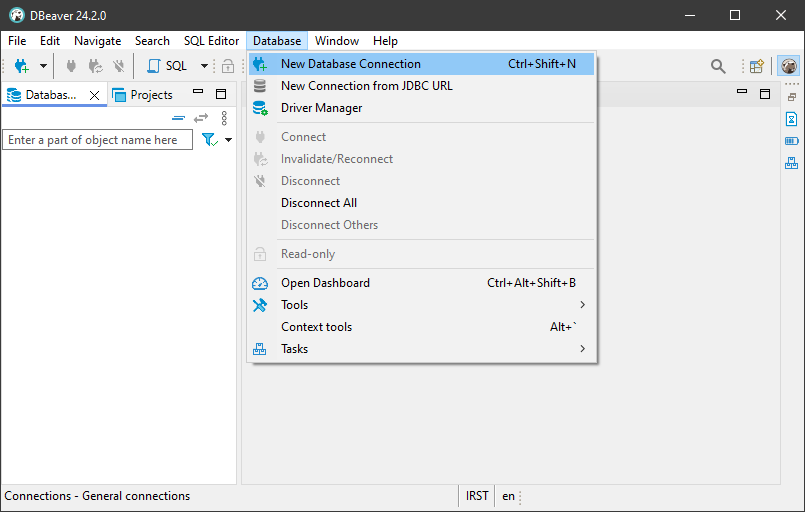
- Choose
SQLitefrom the list.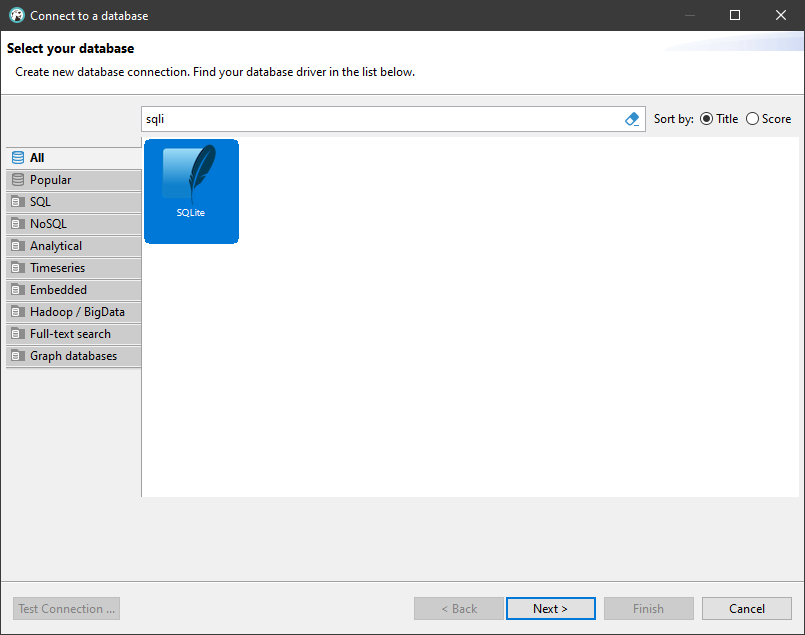
- Select the
Createoption, then choose where you'd like to save your new SQLite database file. At the last step, before clickingFinishyou can test the connectivity of your database by pressing theTest Connectionbutton at the bottom-left.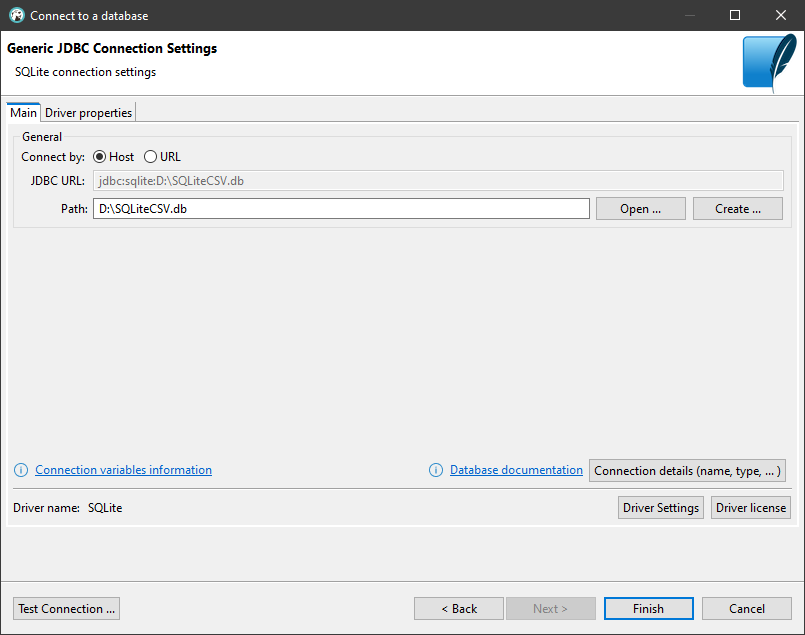
Step 2: Verify the Connection
- Once connected, your SQLite database will appear in the left sidebar, open the database tree to see
Tablesand other sections.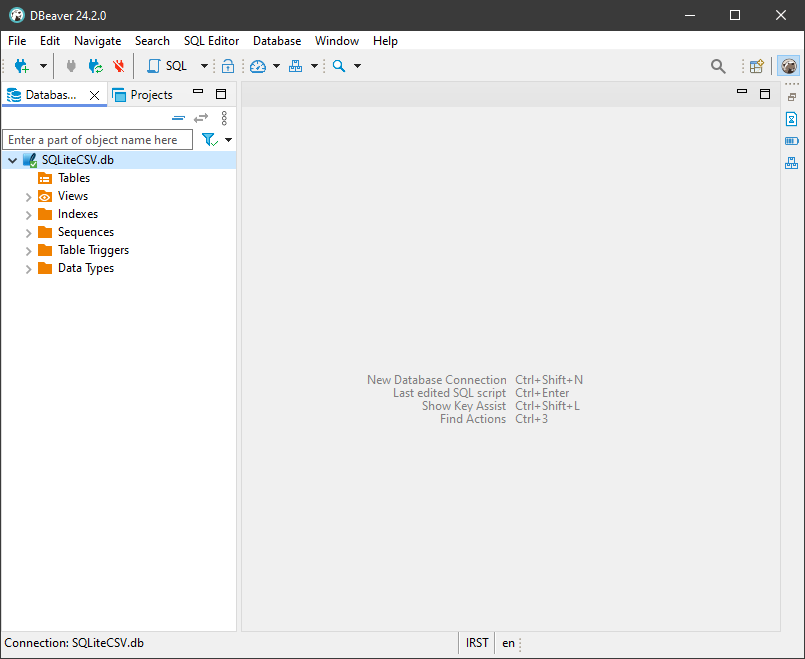
Step 3: Define the Table Structure for Better Import Control
You can create a table that matches your file's structure before importing the CSV. While it's not mandatory, this step gives you more control and precision over the import process and field mapping.
- In DBeaver, go to
SQL Editor > New SQL Script.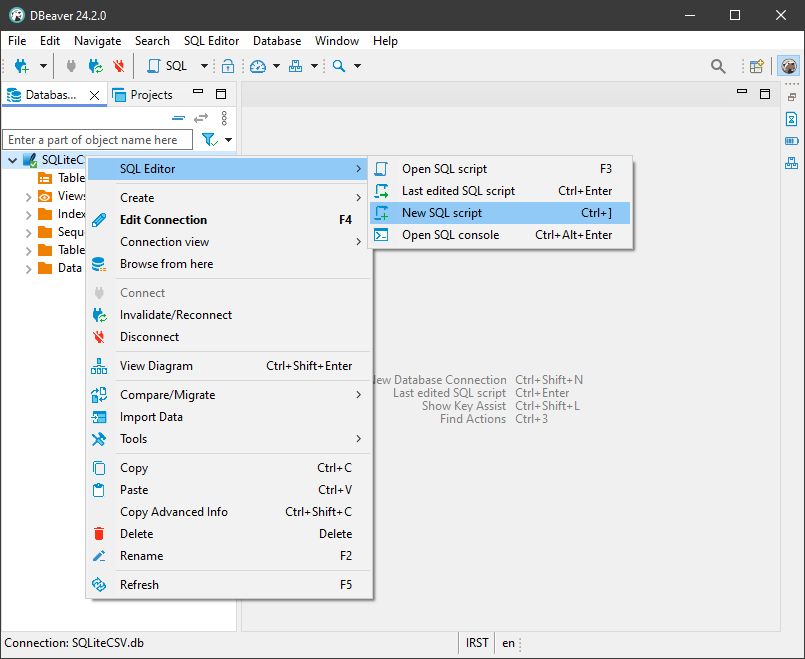
- As an example, we’ll use a CSV file containing
id,name, andemailcolumns as our test file. Run the below SQL script to create an equivalent table namedusersin SQLite, then pressExecutebutton to run it.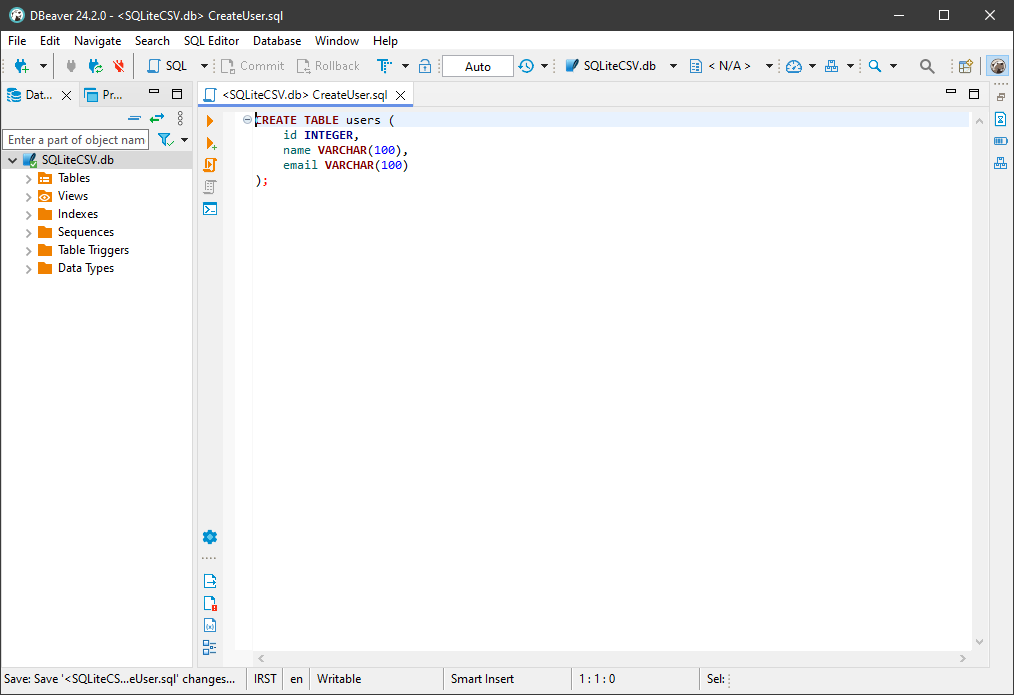
- You should now see the new table appear in the tables section. If it doesn’t show up right away, simply right-click on the database and refresh it. Once it’s visible, double-click on it to view the structure of the
userstable, just as defined.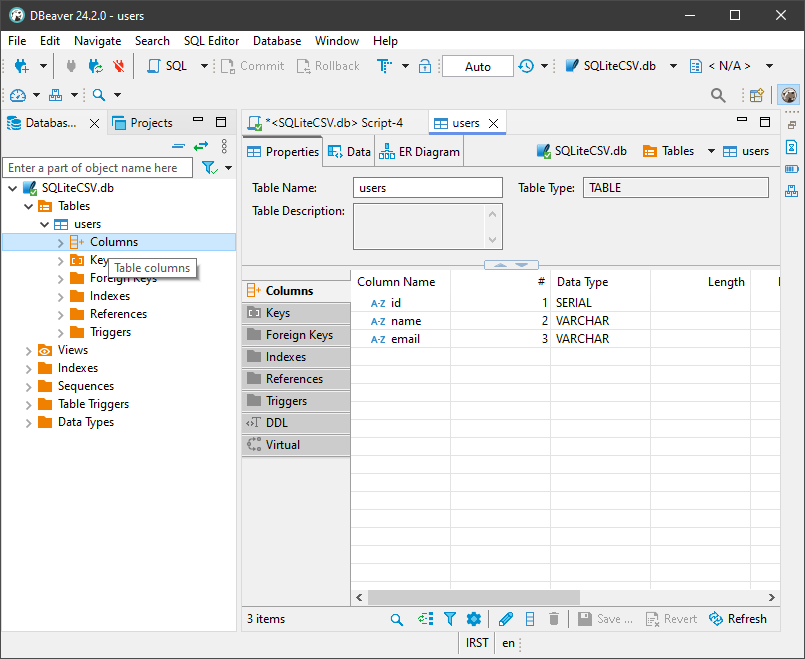 For more information on data types, check out the official documentation.
Step 4: Import the CSV
- With the table set, right-click on it and choose
Import Data. Select your CSV file, map the columns (if necessary), and adjust any settings as needed. Once done, clickStartto import the data.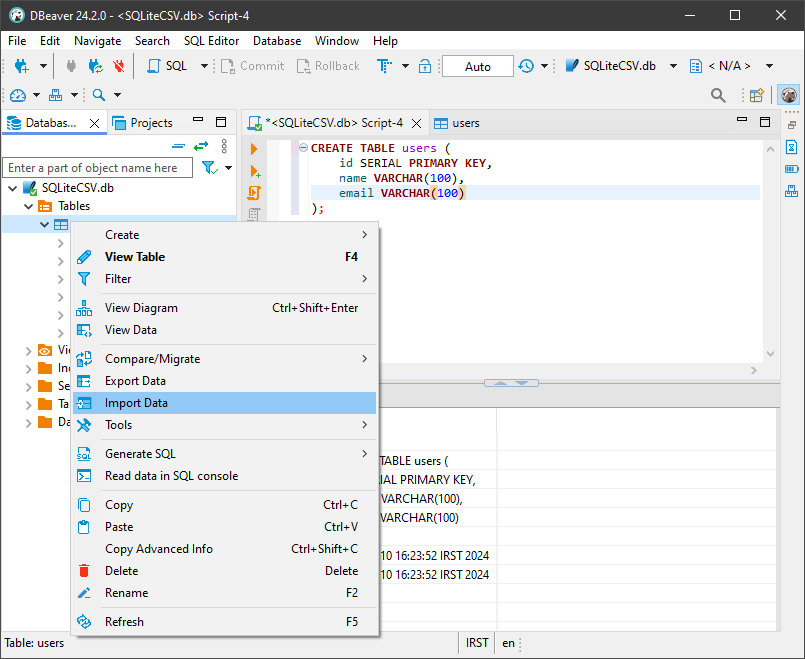 For more options in the import process, you can see the DBeaver Data Import documentation.
Method 2. Import CSV Document Using SQLite CLI and .import Command
The SQLite's Command Line Interface (CLI) is a powerful tool that allows you to perform database operations efficiently.
In my experience, the CLI method is much faster for large files. When I imported a 500MB CSV file containing 11 million rows, the CLI completed the task in just 24 seconds, twice as fast as the DBeaver import wizard.
Here’s how the SQLite's .import command works:
- No table needed: SQLite’s
.importcommand can auto-create a table from the CSV’s first row if it includes headers, so defining a table beforehand isn’t required. However, manually specifying the table structure gives you more control over the import process. - Headers: Use the
--skip 1option to treat the first row as headers and avoid importing them as data. - Handling Extra Columns: If you define the table beforehand and the CSV file has more columns than the table, the extra columns will be ignored. If the CSV has fewer columns, SQLite fills the missing values with
NULL. To prevent data misalignment, make sure the columns in your CSV match the order and data types in your SQLite table. Building on the previous section where we created a database (SQLiteCSV.db) and a table matching theusersCSV file schema, let's now explain how to import a CSV file into this database using the SQLite CLI.
Step 1: Install SQLite on Windows
Why Install SQLite on Windows? Installing SQLite lets you use the command line for faster data imports, especially for large datasets.
- Download the SQLite Tools package from the official website.
- Unzip the file and place
sqlite3.exein a convenient directory (e.g.,C:\sqlite).
To use the features mentioned above, make sure you're running SQLite version 3.32.2 or later.
Step 2: Open SQLite CLI
-
Launch the CLI: Press
Win + R, typecmd, and hit Enter. Then navigate to the directory where you placedsqlite3.exe. If you saved it inC:\sqlite, you can navigate there by running:cd C:\sqlite -
Open Your Database: Navigate to your database by running the below command.
sqlite3 D:\SQLiteCSV.dbIf the database doesn't exist, this command will create it.
Step 3: Import the CSV Data
-
Set Import Mode: Tell SQLite you're importing a CSV file.
.mode csv -
Import the Data: Use the
.importcommand to load your CSV into the desired table. ReplaceD:\users.csvwith the path to your CSV file anduserswith your table name..import --skip 1 D:\users.csv users
Step 4: Verify the Import
Run a quick query to ensure your data is imported correctly.
SELECT
  *
FROM
  users
    LIMIT 10;
After running this in your command line interface, you should see the first 10 records from your CSV file appear in your command line application.
Running SQL Queries on CSV Data with SQLite
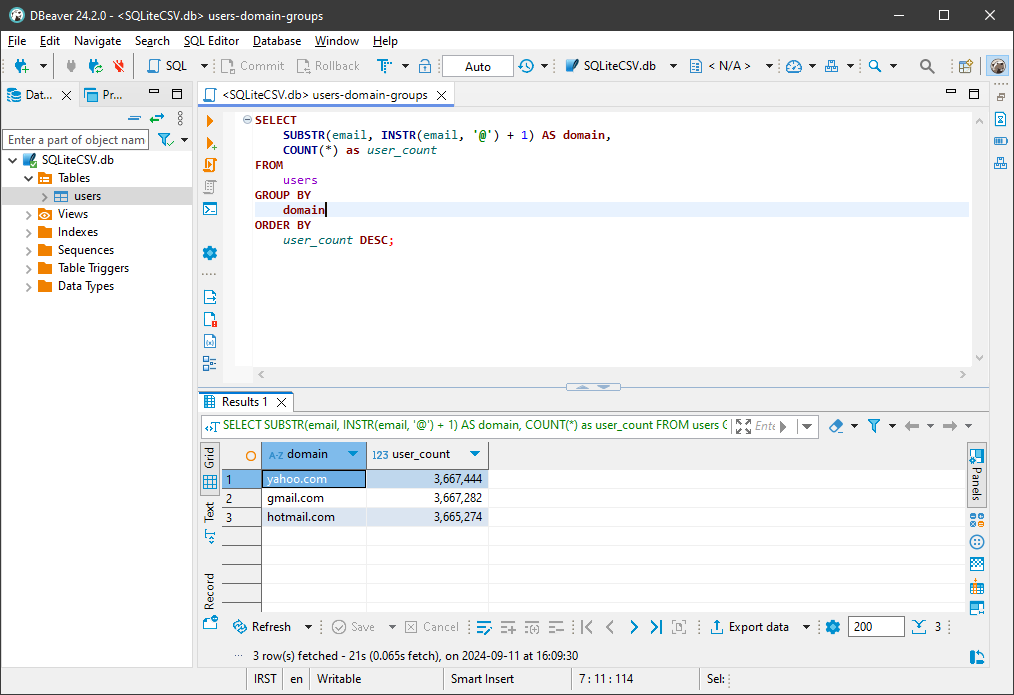
After importing your CSV into SQLite, you can query the data in DBeaver. Right-click your SQLite database in the sidebar, select SQL Editor > New SQL Script to open a new script window, and run your query. For example, to group users by email domain, use this query on the users table:
SELECT
  SUBSTR( email, INSTR ( email, '@' ) + 1 ) AS domain,
    COUNT( * ) AS user_count
FROM
  users
GROUP BY
  domain
ORDER BY
  user_count DESC;
This query groups users by their Email domain and counts how many users are associated with each one. Here’s the result when we run this query against our sample data:
Wrapping Up
For handling large CSV files, you can use SQLite's CLI for the best performance or choose a GUI based tool like DBeaver database client if you prefer a more user-friendly way. Both options allow you to efficiently import and query large CSV files without the complexity of traditional database systems. We encourage you to explore these methods and see how they simplify handling large CSV files. For more details on importing CSV files, check out SQLite documentation.
Related Guides and Resources
For more context on working with data, explore these related guides:
- Learn about working with JSON in SQLite — complementary to CSV querying for mixed data formats.
- Discover advanced JSON querying techniques that apply similar principles to JSON data.
- If your data starts as JSON, see how to convert it to CSV. You can preview JSON files in your browser first with Dadroit V Web.
- For strategies on opening large CSV files, check our comprehensive guide.
- Find real-world datasets in our open JSON datasets collection.
- Explore more options in our online JSON tools hub.
Happy querying!